A 90-second tutorial
See the workflow before you start.
Silent screenshot walkthrough. This captioned video uses actual interface screenshots; no live clicks or processing are recorded. Its synthetic sample demonstrates controls, not real-photo quality.
Press play to view the tutorial, or follow the written steps below. The Lightroom export checklist is in step 2.
No autoplay · No audio track
01 / Before exporting
Choose one consistent sequence.
Use 3–30 consecutive photos from a fixed tripod, with the same framing, focal length, exposure settings and pixel dimensions. Start with 5–10 sharp frames and a simple horizon. Leave out missed focus, camera shake, heavy cloud and obvious moving objects.
This workflow aligns and averages the sky while keeping the ground from a reference photo. It does not combine tracked skies, panoramas, mixed exposures or a separately photographed foreground.
No photos ready?
Load the synthetic sample, then skip to marking the sky. It is a way to learn the tools before selecting your own files.
02 / Camera RAW → rendered files
Export matching sRGB TIFFs.
The browser beta does not open camera RAW files. In Lightroom Classic, prepare the sequence with consistent white balance, exposure, lens correction, crop and orientation. Keep the originals; postpone the final creative edit until after checking the stack.
Select the sequence and choose File → Export. Use the following settings for the first pass. Menu placement can vary by Lightroom version.
| Setting | Use |
|---|---|
| Image Format | TIFF |
| Color Space | sRGB, with the standard embedded profile |
| Bit Depth | 16 bits per channel |
| Compression | ZIP or None; do not use LZW |
| HDR Output | Off; use a normal SDR export |
| Image Sizing | Same dimensions for every file, no more than 32 megapixels each. If the originals are already within that limit, leave resizing off. Otherwise resize the whole sequence identically; 6000 × 4000 is 24 MP. |
| Output Sharpening / Watermarking | Off for the initial stack |
Use single-page, opaque RGB TIFFs. The beta supports selected uncompressed and ZIP-compressed strip TIFFs; it rejects unsupported profiles and variants such as tiled, alpha-channel or BigTIFF files. See the full file requirements.
Export every frame to one folder. JPEG and PNG can also be used as 8-bit sources, but a later 16-bit export cannot recover capture detail already lost. Do not fix a profile error by deleting or relabeling the profile: convert and re-export from your originals.
Adobe documents these export controls in its Lightroom Classic export settings guide. The settings above are chosen for Nightscape Stacker's current compatibility limits.
03 / Into the browser
Choose photos and a foreground.
- Open the stacker on a desktop in Chrome or Edge.
- Select Choose photos or drag the matching files into the import panel.
- In the Foreground column, select a photo with a sharp foreground. This is also the alignment reference.
- Uncheck unwanted frames before starting. To exclude the selected reference, choose another foreground photo first.
The files are decoded and processed on your device. Keep the page open. Large images need working memory and free local storage beyond their compressed file sizes; begin with fewer frames if resources are limited.
04 / A manual sky mask
Keep the landscape out of the mask.
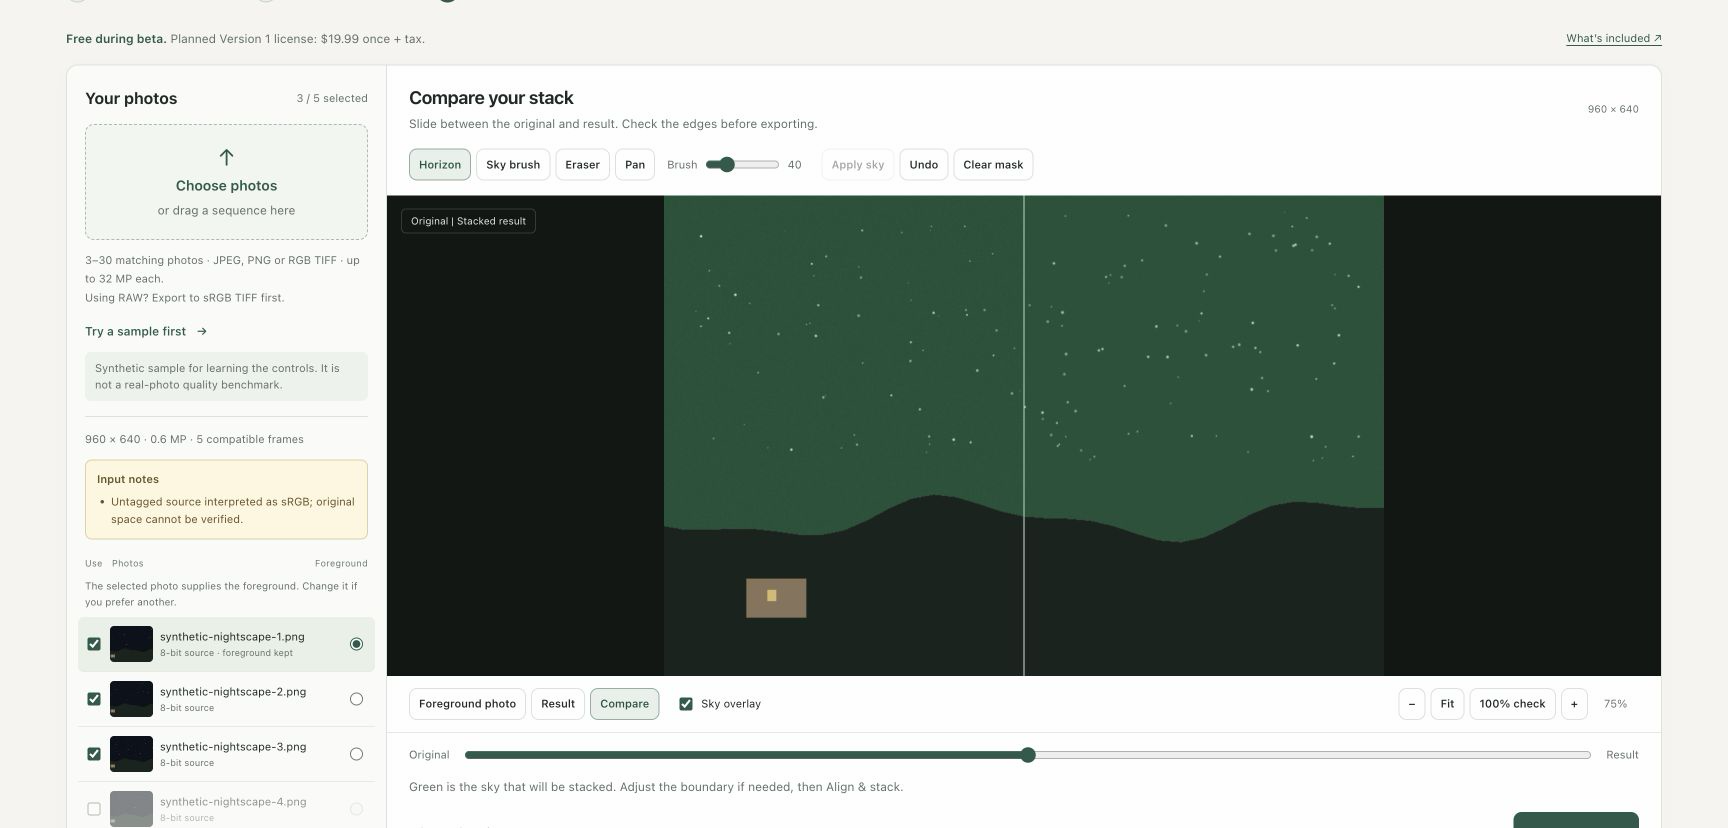
- Choose Horizon.
- Click boundary points from left to right across the preview, following the sky/land boundary while keeping foreground detail outside the selection.
- Select Apply sky. Green marks the sky that can be stacked.
- Use Sky brush to add sky and Eraser to remove ground or trees. Scroll to zoom; hold Space to pan.
Keep ridges, trunks and branches outside the green area. For a first attempt, leave tiny gaps between leaves as reference pixels. This version does not automatically separate fine branches. Mask editing uses a reduced-resolution preview, so inspect the final boundary rather than assuming every small detail is covered.
Open Save or open a project and save the project if you want to retain your mask and settings. A project does not contain photographs: keep the matching input files too.
05 / Let the sky move
Align and stack.
Select Align & stack and keep the tab open until processing finishes. The engine aligns the stars and averages accepted sky samples in linear light. The foreground comes from the reference photo; it is not stacked or denoised.
Frames that fail alignment checks are omitted. At least three frames, including the reference, must succeed. Review any rejected-frame warnings.
Moving cloud, satellite trails and aircraft trails are not automatically removed. Exclude affected frames yourself. Near the horizon, image edges or regions without enough safe overlap, the result can retain reference pixels; noise improvement may be smaller there.
06 / Before keeping the result
Check the center, corners and horizon.
Use Compare for an overview. Then select Check sharpness at 100% or 100% check. The inspector decodes crops from the full-resolution reference and result.
Are the stars single?
Select Center, Top left, Top right, Bottom left and Bottom right. Look for doubled stars, stretched points, or a corner that fails while the center looks sharp.
Is the boundary clean?
Check ridges and trees for bright or dark seams, ghosting or stars dragged across branches. Adjust the mask and rerun if needed.
Does the TIFF hold up?
The on-screen inspector is an 8-bit display of the crop. Inspect the downloaded 16-bit TIFF in your editor too, including color and the areas you plan to crop or brighten.
If a corner still shows doubled stars, try a shorter sequence, fewer frames or a sharper reference. Severe lens distortion and weak star coverage can make a sequence unsuitable for this beta.
07 / Back to your editor
Save the 16-bit TIFF.
Select Download TIFF — free during beta and wait for your browser's download to finish. Import the saved sRGB RGB TIFF into Lightroom or your preferred editor for the final edit. Keep your RAW originals separately.
More exports also offers a processing report and a sky mask PNG. The mask PNG uses preview resolution. Save the project before closing if you want to reopen the mask with the matching photos.
Try the workflow with your own sequence.
Full-resolution TIFF export is currently free during beta. Your photographs stay on your device.
Open the free browser stacker ↗Questions & fixes
Can I stack RAW files directly?
Not in this beta. Export a matching sRGB TIFF sequence first. This tutorial uses Lightroom Classic, but another editor can work if it produces compatible files. DNG is not a supported substitute for the rendered TIFF export.
Why did my TIFF import fail?
Check that every image has matching dimensions and is no larger than 32 MP. Use a supported single-page RGB TIFF, a standard sRGB profile, 8 or 16 bits per channel, and ZIP or no compression. Re-export unsupported files from the originals. The file guide covers the limits.
Why is my foreground still noisy?
The foreground is taken from one reference frame. This version averages the sky, not the ground. It does not blend a separate blue-hour foreground exposure.
Does local processing mean it works completely offline?
Your photos are processed locally rather than uploaded to a photo server. The website and export access checks still use a network connection; completely offline operation is not promised.
What if the result has a seam or doubled stars?
Check the mask, choose a sharper reference, remove problematic frames and try a shorter sequence. Inspect all corners and the horizon again. Download the processing report if alignment fails. There is no guarantee every lens or sequence will work.
Is the beta free?
Yes, including TIFF export. The planned browser Version 1 license is US$19.99 once, plus applicable tax. General sales are not open yet. See current license details.
For a closer diagnosis, use the doubled-star and horizon troubleshooting guide. If your files or workflow do not fit this beta, compare other Milky Way stacking options.
Stuck at a particular step? Email jensenwonderful@gmail.com with your browser version, file format, dimensions and the failed step. Please keep private originals out of the first message.